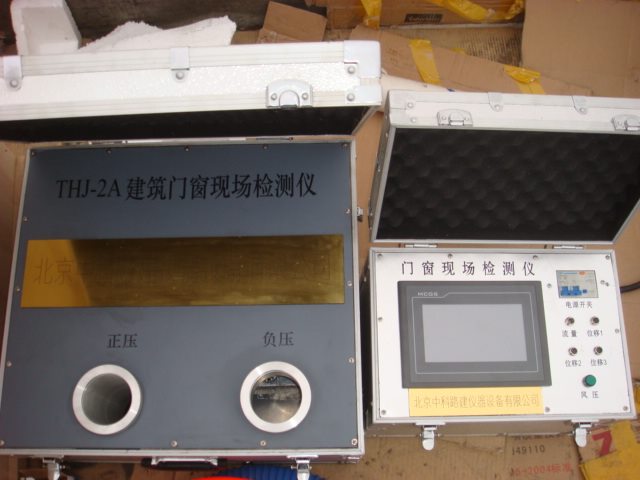
Building door and window detector Overview The building door and window field detector is a new portable door and window field detector developed by our company. Pick Use the manual knob to adjust the air pressure, display the instrument cycle detection and display air pressure, air flow, deformation displacement and so on. The wind source and control adjustment system are integrated into a suitcase, which is small in size, light in weight, easy to carry, reliable and durable, and easy to use. Applicable standard JG/T211-2007 "On-site inspection method for airtight, watertight and wind pressure resistance of building exterior windows" GB/-T7106 , 7 , 8 standard. Main Specifications voltage: AC220V power: 7.2kW Airtight pressure: ± 200Pa Watertight pressure: 0 ~ +700Pa Wind pressure: ± 2000Pa Air flow: 20m/s ( 267.8 Lime/hour ) working environment 1 . Relative humidity: ≤ 85% No condensation; 2 . temperature: 0 ~ 50 °C; 3 . altitude: <1500 Meter; Display the correspondence between the channel number of the table and the detected amount Channel number Measured CHl ± 200Pa pressure CH2 Air flow 0 ~ 267.8 Lime/hour (flow rate 20m/s ) CH3 ± 6000Pa pressure ( Actual value = Display value Xl0) CH4 , 5,6 Three-point displacement display, 0 ~ 20mm Steps 1) Install the static pressure box, air path, water system: 2) Open the suitcase and insert the straight pipe section of the wind pipe into the positive pressure port and insert it tightly: 3) Insert the air flow meter into the straight pipe section and insert its cable plug into the flow socket on the suitcase: 4) Apply the plastic cloth to the outer window and put the hose into the plastic cloth and seal it with tape. 5) Insert the pressure tube into the controller and clamp it in the plastic cloth. 6 ) close the air switch, turn on the power, and the airtight light is on; 7) Adjust the “Voltage†knob counterclockwise to the minimum; Positive airtight 6)-17) Pre-pressurization 6 )~ 10 ) 8) Press "Airtight" "Wind" 1 》 button; if the wind is insufficient, "wind 2 》 button is also pressed; 9 ) Rotate the “Voltage†knob clockwise while watching the display CH1 Channel pressure value 150Pa (See the correspondence between the channel number of the display table and the detection amount); 10) Press "wind power l 》 button; 11) When the pressure returns to zero, press "Wind again" 1 》 button, arrived 150Pa After stabilization 3s , press "wind power again" l 》 button; 12) repeat 9)- Times, adjust the "Voltage" knob counterclockwise to the minimum: Airtight detection 11) ~ 15) 13 ) press "wind power" l 》 button; 14) Slowly rotate the "Voltage" knob clockwise while watching the display CH1 Channel pressure value l00Pa After stabilization L0s; 15 Slowly rotate the "Voltage" knob clockwise while watching the display CH1 Channel pressure value 150Pa After stabilization L0s; 16) Slowly rotate the "Voltage" knob counterclockwise while watching the display CH1 Channel pressure value l00Pa After stabilization L0s: 17) Adjust the “Voltage†knob counterclockwise to the minimum; Negative airtight 18) Insert the straight pipe section of the wind path into the negative pressure port and insert it tightly; Pre-pressurization 17) ~ 20) 19) Slowly rotate the "Voltage" knob clockwise while watching the display CH1 Channel pressure value -150Pa (See the correspondence between the channel number of the display table and the detection amount); 20) Press "wind power 1 》 button; twenty one When the pressure returns to zero, press "Wind again" 1 》 button, arrived -150Pa After stabilization 3s , press "wind power again" 1 》 button; twenty two) repeat 19) Once, adjust the “Voltage†knob counterclockwise to the minimum; Airtight detection twenty one) ~ 25) twenty three ) press "wind power" 1 》 button: twenty four) Slowly rotate the "Voltage" knob clockwise while watching the display CHl Ramp pressure value. -100Pa After stabilization L0s; 25) Slowly rotate the "Voltage" knob clockwise while watching the display CH1 Channel pressure value -150Pa After stabilization L0s; 26 Slowly rotate the "Voltage" knob counterclockwise while watching the display CH1 Channel pressure value -l00Pa After stabilization L0s; 27) Adjust the “Voltage†knob counterclockwise to the minimum; Watertight detection 28) Insert the straight pipe section of the wind road into the positive pressure port and insert it tightly; 29) Press "wind power 1 》 button: 28) Slowly rotate the "Voltage" knob clockwise while watching the display CH2 Channel pressure value 500Pa After stabilization 3s After pressing "wind power 1 》 button: 30 ) Press "Wind again" 1 》 button, wait CH2=500Pa stable 3s; 31 )repeat 28)- Times, press "wind power 1 》 button; 32) Open the sprinkler system to regulate water flow 2L/min.m2 , start spraying; Stable pressure detection 31) ~ 32) 33) Spray 5 After a minute, press "Wind again" 1 》Button, slowly rotate the “Voltage†knob clockwise while watching the display CH2 Channel pressure value I00Pa After stabilization 5m Rear; 34) Continue to increase by steady step-by-step pressurization 700Pa ,stable 5m , complete stable pressure detection; Design value pressure detection 34) ~ 35) 34) Spray 5 After a minute, press "Wind again" 1 》Button, slowly rotate clockwise Knob while watching the display CH2 Channel pressure value is designed to be stable after pressure 15m Rear, Complete design value pressurization detection. 35) Adjust the "Voltage" knob counterclockwise to the minimum, press "Wind" l 》 button; Wind pressure resistance test 36) ~ 59 ) Preparing for pressurization 36)-40) 36) Insert the straight pipe section of the wind pipe into the positive pressure port and insert it tightly: 37) Slowly rotate the "Voltage" knob clockwise while watching the display CH2 Channel pressure value 500Pa (displays the correspondence between the channel number of the table and the detected amount); 38 ) press "wind power" l 》 button; 39 When the pressure returns to zero, press "Wind again" 1 》 button:, arrived 500Pa After stabilization 3s , press again F Wind 1 》 button; 40) repeat 39)- Times, adjust the "Voltage" knob counterclockwise to the minimum; Positive deformation detection 41) ~ 47) 41) Press "wind power 1 》 button; 42) Slowly rotate the "Voltage" knob clockwise while watching the display CH2 Channel pressure value 200Pa After stabilization L0s Simultaneous recording CH4 , 5 , 6 Displacement value and calculate deflection B , B ≥ 1/300 Execution 47); 43 ) Rotate the “Voltage†knob clockwise while watching the display CH2 Channel pressure value 400Pa After stabilization L0s Simultaneous recording CH4 , 5 , 6 Displacement value and calculate deflection B , B ≥ L/300 Execution 47); 44 )...... 45 Slowly rotate counterclockwise < Adjust the knob, while watching the display CH2 Channel pressure value 1800Pa After stabilization L0s Simultaneous recording CH4 , 5 , 6 Displacement value and calculate deflection B , B ≥ L/300 Execution 47): 46 Slowly rotate the "Voltage" knob counterclockwise while watching the display CH2 Channel pressure value 2000Pa After stabilization L0s Simultaneous recording CH4 , 5 , 6 Displacement value and calculate deflection B , B ≥ L/300 Execution 47 ) 47 Adjust the "Voltage" knob counterclockwise to the minimum; Negative preparatory pressurization 48) ~ 52) 48 ) Insert the straight pipe section of the wind road into the negative pressure port and insert it tightly: 49 ) Rotate the “Voltage†knob clockwise while watching the display CH2 Channel pressure value -500Pa (displays the correspondence between the channel number of the table and the detected amount); 50 ) press "wind power" 1 》 button: 51 When the pressure returns to zero, press the "Airtight" button again to arrive. -500Pa After stabilization 3s , press the "airtight" button again; 52) repeat 51 ) once, adjust the "Voltage" knob counterclockwise to the minimum; Negative positive deformation detection 53) ~ 59) 53 ) press "wind power" l 》 button; 54 ) Rotate the “Voltage†knob clockwise while watching the display CH2 Channel pressure value -200Pa After stabilization L0s Simultaneous recording CH4 , 5 , 6 Displacement value and calculate deflection B , B ≥ -l/300 Execution 59); 55) Slowly rotate the "Voltage" knob clockwise while watching the display CH2 Channel pressure value -400Pa After stabilization L0s Simultaneous recording CH4 , 5 , 6 Displacement value and calculate deflection B , B ≥ -1/300 Execution 59 ); 56 )...... 57 ) Slowly rotate counterclockwise > Knob while watching the display CH2 Channel pressure value -1800Pa After stabilization L0s Simultaneous recording CH4 , 5 , 6 Displacement value and calculate deflection B , B ≥ -1/300 Execution 59): 58) Slowly rotate the "Voltage" knob counterclockwise. Watching the display table at the same time CH2 Channel pressure value -2000Pa After stabilization L0s Simultaneous recording CH4 , 5 , 6 Displacement value and calculate deflection B , B ≥ -l/300 Execution 59); 59 Counterclockwise adjustment > Knob to minimum; End detection 60)-62) 60 Adjust the "Voltage" knob counterclockwise to the minimum; 61) press F Wind 1 And wind 2 》 button; 62) Turn off the air switch, turn off the power, and the power indicator is off. Precautions 1) When the air flow meter is inserted into the straight pipe section, the direction is adjusted correctly; 2) To ensure safety, a reliable grounding wire should be connected to the detector at the site; 3) All units of measurement should be converted to the unit of measurement required by the standard, which is convenient for the judgment level.
ZGAR Accessories
ZGAR electronic cigarette uses high-tech R&D, food grade disposable pod device and high-quality raw material. All package designs are Original IP. Our designer team is from Hong Kong. We have very high requirements for product quality, flavors taste and packaging design. The E-liquid is imported, materials are food grade, and assembly plant is medical-grade dust-free workshops.
Our products include disposable e-cigarettes, rechargeable e-cigarettes, rechargreable disposable vape pen, and various of flavors of cigarette cartridges. From 600puffs to 5000puffs, ZGAR bar Disposable offer high-tech R&D, E-cigarette improves battery capacity, We offer various of flavors and support customization. And printing designs can be customized. We have our own professional team and competitive quotations for any OEM or ODM works.
We supply OEM rechargeable disposable vape pen,OEM disposable electronic cigarette,ODM disposable vape pen,ODM disposable electronic cigarette,OEM/ODM vape pen e-cigarette,OEM/ODM atomizer device.
Disposable Pod Vape,Disposable Vape Pen,Disposable E-Cigarette,Electronic Cigarette,OEM vape pen,OEM electronic cigarette. ZGAR INTERNATIONAL(HK)CO., LIMITED , https://www.zgarette.com